27 February 2014

OMG Gold Digger

Hi everyone! How's your week so far?

Today, I don't have nail art for you, but I do have some swatches to share.


On my nails is two medium coats of OMG Gold Digger with top coat. I was so attracted with it's "loud" color that I immediately grabbed it from the rack.

OMG Gold Digger is a pretty gold shimmer polish. It is pigmented enough that I only used two medium coats to cover my nails. It's consistency is very easy to handle that I didn't have any problems with the application.


The only problem I had was the shrinkange. Or so I thought it was. If you would notice my middle finger, it has something like a tip wear. Though I'm also thinking that it might be with the matte top coat that I used or it was really me not taking care of my newly polished nails.


Although I am generally happy with the polish itself, I don't think that it is something I'd wear on its own. I kind of think that the color does not complement my hands and it looks a bit too old. But I think it's good for nail art.

Here's a shot indoor with flash


And this one's indoor without flash


I decided to mattify it with Bobbie Matte Top Coat. It did toned down the "old look" on my hands.

And this one's taken outdoors, under shade without flash.


Nothing still beats the natural lighting. I love this photo compared to the other photos I took.

Sorry, I didn't follow the 2-3 pics per post. I hope y'all don't mind ;)

This specific OMG Polish costs PhP20 for a 10ml bottle. Isn't that affordable? It's available on selected department stores nationwide.

So what do you guys think?

Leave any comments, I'd be most happy to read and reply. Keep rockin' girls!

Note: this item is purchased by the blogger and it's review is entirely personal opinion

13 February 2014

"Pirated" Domo Kun

Hi guys!

How's everyone? I'm actually not scheduled to post this today, but I can't sleep (which is kind of crazy cause I'm starting to feel like zombie). So I just decided I'll just share with you the nail art I did last Monday, which I called "Pirated" Domo Kun.


I'm not really sure if the word "pirated", is globally acceptable. But here in where I live, we refer to imitations as pirated.


I started off with OMG Sunny Tan as my base color. It's actually a few shades lighter than Domo Kun's brown color, but it's the only brown available. So that's one point for the piracy.

Then I started drawing his face. If you would notice, his teeth are round, instead of a pointy one. Yes, that's another piracy out there. I tried (I did!) To draw pointy teeth, but I failed. So I decided on just putting white dots instead. I still find them cute.

I topped it with Etude House Top Coat before adding on Girl Stuff Matte Magic for a more cartoony look.


I'll practice more on the pointy teeth and maybe try this design again. This is actually a design requested by my first fan, kirbyandthesneaks. She's my godchild actually.

So, that's it for today's post. I really hope I could get to snooze off after this.

Keep rockin' girls. :)

Nail polish used:
OMG Sunny Tan
OMG White Out
OMG Black Out
OMG Salsa

09 February 2014

Dotted French

Hey everyone!

I know, I know. I've been MIA for so long. I won't make up excuses for that. But just to sum it all up, I needed to fix my life. But I never forgot my love for nail art.

Anyway, what I'll share with you today is my most recent nail art that I wanted to call Dotted French


Here, I used OMG First Date as the base coat with Girl Stuff Matte Magic on top.


I've recently been purchasing OMG nail colors. Aside from their wide range of attractive colors, they really are budget friendly. This specific color is less pigmented so I had to use 4 thin coats of polish.

I then dotted different sizes on different places using OMG Bahama Blue and OMG Atlantis. But I only placed the dots on the tip of my nails for a French manicure effect. Then, dabbed on some top coat on the dots for added contrast.

So that's it. I hope you guys liked my comeback post. I do hope to post regularly now. But less pictures for the meantime (just about 2-4 pictures per post)

Till next time! Keep rocking girls!

This is a test post

17 December 2012

kkcenterhk Love Black and White Water Decals


Hi lovelies!

I know, I know, it’s been quite some time that I was not able to post anything on this blog. And I’m sorry for the very long wait. My travel to and from work is killing me, that whenever I get to have time off, I’d rather lie in bed the whole day. Anyway, I’d still like to take this opportunity to thank all of you who stayed in this blog. Thank you.

For today, I wanted to show you some reviews. A couple of months ago, I received some nail art implements. As you all would have notices, I have never tried nail decals. All my designs have been hand painted. So imagine my excitement when I received a card saying that I have a parcel waiting for me in the post office. I was expecting about 2 or 3 nail decals. Much to my delight, when I opened the envelope, I was welcomed by not 2 or 3 nail designs, but 8 of them! Yes, you read it right, eight. I had a face-splitting grin.

kkcenterhk Nail Designs

kkcenterhk Nail Designs


Let me show them to you one by one. First up, the Love White and Black Decals. This sheet contains 20 assorted white and black cats “in love”.

kkcenterhk Love White and Black Decals


Then I have this Bow Button Knot water decals. It consists of 10 black and 10 white “shoe-lace” like water decals. The photo does not capture the white one very well since it has the same color as the background.

kkcenterhk Bow Button Knot Water Decals


I also received a “shattered glass” water decals. I am not really sure if this is a water decals. The item looks like a sticker to me. It’s not pre-cut as well, so I’m not sure how this works. I’m still finding it out.

kkcenterhk "Shattered Glass"


Included in the package are three fluffy stickers: rhombus, red and gold dairy cow and black and white leopard. Each sheets contains 10 round tips and 10 square tips on assorted size. Perfect to fit all your nails.

kkcenterhk Rhombus Fluffy Stickers

kkcenterhk Red and Gold Dairy Cow Stickers

kkcenterhk Black and White Leopard Fluffy Stickers


I also have this pre-cut transfer sticker decals: volleyball and flowers designs.

kkcenterhk Volleyball Transfer Sticker Decals

kkcenterhk Transfer Sticker Decals


This post will also show you a quick tutorial and a review of the Love White and black decals.

kkcenterhk Love Black and White Water Decals on Caronia Kiwi


Here's what you need to start up.

Initial Set up


You’ll need:
  • Tweezers
  • A small container with water
  • Base and Top coat
  • Nail polish (a color of your choice)


First, you’d need to make sure your nails are clean: free or dirt, oil or alcohol. Prepare all your tools and cut out the designs to make it easier for you to apply. I lined up the cut-outs according to how I wanted them on my nails.

Once everything is set, apply your base coat to protect your natural nails, and paint in your polish color of choice. For this review, I used Caronia Kiwi. Make sure your polish is completely dry before continuing on with the next step.


Place one of the cut outs on the container with the water and allow it to float in about 30 seconds. Once your sure that it is thoroughly wet, you can go ahead and pick it up. Be careful in removing the sticker in its paper backing, the sticker is very sensitive, and one wrong move, it will end up in waste.


You can choose to use tweezers in picking up the design and setting it on your nails. I chose to use just my finger with the wrong side up. I find that easier. Carefully place the design the way you want it on your nails. The reason why you need to have your polish completely dry is so that you can move the decals on top of your nails until your satisfied in its position. Once your happy with the way they look on your nails, finish your design with a top coat to protect your design and add shine.

And that’s it! Easy huh? This nail design works best for people who’d want to design their own nails but does not have patience in drawing them.

kkcenterhk Love Black and White Cat Water Decals


What I love about this design is that they stay on your nails for a good one week. Well, maybe longer. I change my polish every week so that’s the longest they can stay. Just make sure you cover it with a top coat to make sure it last.

kkcenterhk Love Black and White Cat Water Decals
You just have to be very, very careful in handling the decals. They are very thin and fragile. That’s why I prefer using just my fingers to pick them up. Tweezers might crumple them up and bye-bye decals. But if you find it easy to control using tweezers, then by all means, use them. J

This sheet contains 20 assorted black and white cats and is available online at kkcenterhk. These are individually sold per sheet at US$2.82, product code NNAIL-WDSY1175 or simply click here to purchase.

You can also use this coupon code for a 10% off. Coupon code available till January 31, 2013.


That's it for today. i will be posting all the other items as soon as i can. :)

Disclaimer: Items are sent to me for unbiased review.

28 October 2012

Nail Art - M&M's


Hey lovelies! How's everyone? It's been such a long time since I last created a blog post. I've been missing this big time. I'm still struggling to manage my time so I can post regularly again. But for the mean time, I got some nail art for you all.

Last month, I joined a contest held by Caronia Philippines. Caronia has been one of the leading brands of nail polish and nail care products for as long as I can remember. Last month’s theme is to create a chocolate inspired nail design. And this is what I came up with.


M&M's on my hands
M&M's nail art
I already did this design previously on a friend’s nail. But I think I drew this better this time. I used different Caronia nail polishes as base color and drew in the M&M’s face. I drew different expression to add some character.

M&M's nail art with flash
I really believe that I did well on this design since I got quite some compliments from my co-workers with my nails – And without me showing them my nails. I really loved the attention my nails got during that day.
It’s been easier for me to do this since my first try, considering that I did these on my own nails. Here’s a closer look on my two fat m&m’s. J


M&M's on my thumb


Caronia usually requires a beauty shot of the designs showing your face. Although, last month, it was not requires, I still sent them a picture showing my face, and I liked how it looks. This is my entry.
Although I did not win, I am happy with my experience on doing this nails as well as the result. Also, I do not mind losing especially if the winners are deserving of their price. And they are very worth all the prizes they receive.
M&M's  beauty shot
That’s it for today’s post. I really hope to get back on track soon. I’m still active online, it’s just that I was not able to post much here. Feel free to contact me on any of my online accounts: Facebook, Tumblr and you can also follow me on my new Pinterest account.

As always, feel free to leave a comment. Keep rockin’ girls. 

Colors used:
Caronia Simply Red
Caronia Sapphire
Caronia Kiwi
Caronia Sun Kissed
Caronia Sweet Surprise
Caronia Summer Fling
Sassy Nail Art Pen White
Sassy Nail Art Pen Black

07 June 2012

Last Hurrah for Summer – Caronia Sweet Bliss Collection

 Warning, this post is long and a bit pic heavy.
Hi everyone! Did you miss me? I know I haven’t been active for quite some time now. Aside from my internet connection issues, I still have some personal matters that I have to deal with. I might not be able to post regularly yet, but I wanted to show you something before summer ends here.

Unlike other countries, Philippines only have two seasons, summer and Rainy (similar to fall for other regions). Summer is from the month of March until early June, or until our weather men advises us that it is already the start of rainy season. I’m not quite sure if they have already announced that but it has been raining for the past few days and we are already experiencing typhoons (which is actually normal here). But I wanted to catch up on my posting and since summer is just starting on other countries, so I will be showing you guys a summer collection from a local nail polish.

Caronia Philippines is an established local brand of nail polishes and nail care products. They have been in the industry as far as I can recall. Last year (2011), they launched a summer nail polish collection which is called the Sweet Bliss. I fell in love with the colors when I first saw it and I promised myself that I will complete the set. Baby Pink is the first polish that I bought. I then had On the Go and Sun kissed. I brought these babies on my vacation in Holland. Unfortunately, I have to leave them behind on my way home. I was able to grab the last three polishes to complete the set last September when I got back in Manila, but I had to wait for the other polishes so that I could show them to you. Last week, my mom sent me my nail polishes, so I was able to swatch those polishes and show these to you.

Caronia Sweet Bliss Collection

Caronia Sweet Bliss Collection
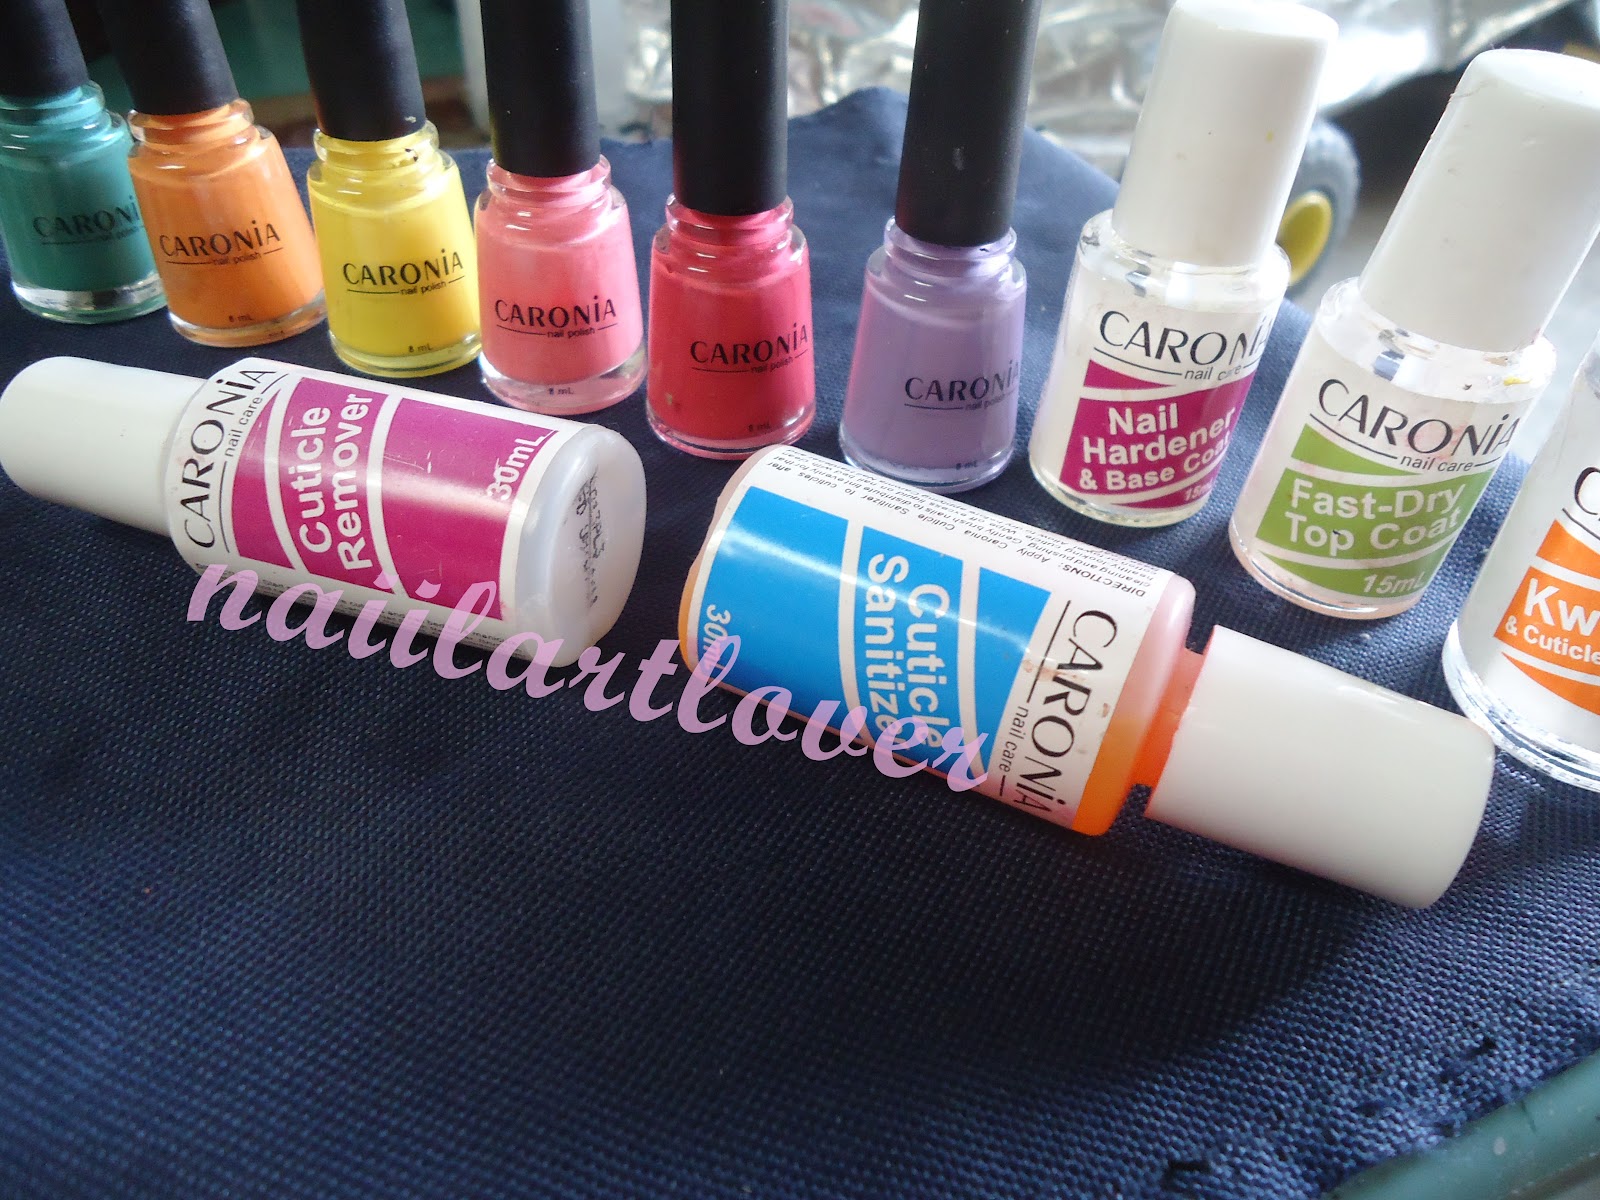
From left to right are Sweet Surprise, Sun Kissed, On the Go, First Crush, Summer Fling and Baby Pink. This post will be an all Caronia Manicure. I also used Caronia Cuticle Remover, Caronia Cuticle Sanitizer, Caronia Nail Hardener and Base Coat, Caronia Fast Dry Top Coat and Caronia Kwik-Dry and Cuticle oil.

Caronia Manicure Set


Caronia Baby Pink
This is Baby Pink, a light pink regular crème polish. I could still recall the first time I used this polish; it went on smoothly on two coats. Unfortunately, this photo does not show that. I suppose this is because this bottle is an old and the polish is a bit thick.

Caronia Baby Pink

If you would notice, it looks bumpy on my nails. That is because it is. On my nails are three thin coats. It’s a bit sheer so I had to go on three. But I can no longer make it even. I think I’d need to purchase new bottle. Did you notice that it is shiny? One thing I like about this polish is that I wouldn’t need a top coat to make it shiny. But I think I’d need those to make it even. No top coat was used for this polish but it look like it does. Over-all this polish is okay.

Caronia Summer Fling
This is Summer Fling. Summer Fling is the red crème polish, but it’s more on the pink tone. It looks pink to me than red, especially if you place it beside other reds, but it looks red if you place it beside pinks.

Caronia Summer Fling
One good thing about this polish is that it is a one-coater, although making it two wouldn’t harm as well. On my nails is one medium coat. Application is a breeze and the consistency id okay; not too thick, not too thin as well.

Caronia Summer Fling

This bright red-pink polish is also shiny that it does not need top coat. Here’s a closer look on my thumb.
Caronia Summer Fling

Caronia Sun Kissed
Next one is Sun Kissed, this is one of my favorites in the collection. It’s a yellow-orange regular crème polish. I’m starting to think that I have a love-hate relationship with oranges. I’m not really fond of orange but this has become an exception. I love the color on my nails.

Caronia Sun Kissed
I did not have problems with the application. All you need is two thin coats and you’re good to go. Just like the first two polishes, this is also shiny by itself.

Caronia Sweet Surprise

I know you guys already know Sweet Surprise. I already made a review on this one a few months back. If not, you can see it here.

Sweet Surprise is a bright yellow frosted polish. This is the only polish in the collection that is not crème. The glitters are so tiny that it’s not so visible. It looks like a regular crème to me.

Caronia Sweet Surprise

On my nails is two thin coats. I didn’t have issues applying the polish. It also shines by itself without the use of a top coat.

Caronia Sweet Surprise
Caronia First Crush
Our second to the last baby is First Crush. You might’ve seen it on my Purple Plaid post. Looking back, I saw that I promised to make a review and swatch of this polish. I know it took me quite sometime to do that.

Caronia First Crush

First Crush is my favorite among the six polishes. It is a lavender crème polish. This is a good one coater. But I would suggest using two if you intend to put on top coat. On my nails is one medium coat without top coat. Application went on smoothly and the consistency is just right.

Caronia On the Go

And last but definitely not the least is my second favorite, On the Go. I already swatched this on my Tumblr account but haven’t written anything about it yet.

Caronia On the Go
On the Go is a teal crème polish. It’s pigmented that you only need one medium coat to achieve bottle color. I’m happy with the formula since it did not became thick even after a long time, unlike my Baby Pink. No problem with the application and shine okay without top coat.

After finishing all those swatches, I decided I’d use them altogether. I didn’t want to do the nail swirl, so I decided I’d do a gradient instead. I started on with different colors on my nails.

Sweet Bliss Skittles

Sweet Bliss Skittles

I find those bright summer colors very lovely on my hands that I actually considered not using any design anymore. But at the same time, I find it boring so I still went and do some sponging on the tips. Here’s the final result.

Sweet Bliss Gradient
On my thumb is First Crush and On the Go, on my index is Sweet Surprise and First Crush, on my middle finger is Sun Kissed and Sweet Surprise, on my ring finger is Summer Fling and Sun Kissed and on the pinky is Summer Fling and Baby Pink. (First colors are based color sponged with the second color)

Sweet Bliss Gradient

Here’s how my non-dominant hand looked like. On thumb is Sun Kissed and Baby Pink, on my index is First Crush and Sun Kissed, on my middle finger is Summer Fling and First Crush, on my ring finger is Sweet Surprise and Summer Fling and on the pinky is On the Go and Sweet Surprise. (Again, first color is the base, sponged with the second color)

Here’s a closer look


I’m not that happy with how this turned out. It’s so bumpy. All those “fibers” from the sponge were left on my nails. This is kind of unusual since my other <hp>sponge designs didn’t end up like this. I should’ve left the bright skittles. But it’s too late for that. Here are other shots of the gradient.

Sweet Bliss Gradient

Sweet Bliss Gradient

So that’s it for this post. I really hope to be back on track, but I guess it would take a couple more weeks for me to be able to post regularly. But I’ll try my best to post every now and then in between.
Please tell me what you think by leaving a comment.
Related Posts Plugin for WordPress, Blogger...